1 基本知识
Git 共有三个级别的 config 文件,分别是 system、global 和 local。在当前环境中,分别对应 %GitPath%\mingw64\etc\gitconfig 文件、$home\.gitconfig 文件和 %RepoPath%\.git\config 文件。其中 %GitPath% 为 Git 的安装路径,%RepoPath% 为某仓库的本地路径。所以 system 配置整个系统只有一个,global 配置每个账户只有一个,而 local 配置和 git 仓库的数目相同,并且只有在仓库目录才能看到该配置。
1.1 查看配置
参考资料:http://www.jianshu.com/p/0ad3d88c51f4
由于之前已经成功安装 Git 并登陆到过 GitHub,因此查看当前配置时,最后两行会显示用户名及用户密码。
$ git config --list | grep user
user.name=xxxxxx
user.email=xxxxxx@xxxx.com
这里的 user.name 和 user.email 就是 Author 信息。此时,上面提到的三个级别都配置了 user 信息。当 git commit 时,Author 信息依次读取 local、global 和 system 的配置,如果找到则不再继续读取。其他配置的读取顺序也是如此。
GitHub 支持 https 和 ssh 协议连接。下面以较为安全的 ssh 方式作为示例进行说明。
2 生成、配置密钥
2.1 生成密钥
- 由于之前已经生成过密钥并成功登陆过 GitHub,这里暂时不考虑多账号切换登陆的做法,因此直接
cd ~/.ssh切换到 SSH 所在目录,将其中的id_rsa和id_rsa.pub备份好后删除掉。 - 输入
git config --global user.name "haopen"和git config --global user.email haopeng.yn@gmail.com切换到新的账号,还可以用git config --global user.name和git config --global user.email看账号是否添加成功。
$ git config --global user.name "haopen"
$ git config --global user.email haopeng.yn@gmail.com

$ git config --global user.name
haopen
$ git config --global user.email
haopeng.yn@gmail.com

$ git config --list
......
user.name=haopen
user.email=haopeng.yn@gmail.com- 接下来输入
ssh-keygen -t rsa -C "haopeng.yn@gmail.com"生成新的密钥。根据这篇博文的例子,在下面生成密钥文件时一路回车,不指定任何文件名称,直接使用系统默认的名称,到最后一步时密钥生成成功!
$ ssh-keygen -t rsa -C "haopeng.yn@gmail.com"
Generating public/private rsa key pair.
Enter file in which to save the key (/c/Users/haopeng/.ssh/id_rsa):
Enter passphrase (empty for no passphrase):
Enter same passphrase again:
Your identification has been saved in /c/Users/haopeng/.ssh/id_rsa.
Your public key has been saved in /c/Users/haopeng/.ssh/id_rsa.pub.
The key fingerprint is:
SHA256:ZH9aXjek6jUT7DWIe7SBrlFGuy50SjseMTtg5HSZLJw haopeng.yn@gmail.com
The key's randomart image is:
+---[RSA 2048]----+
|                 |
|      . o o      |
|       Eo= .   . |
|      +oo.. = +  |
|       +So.*oB.+.|
|      . .oB**.=.o|
|        o===.B   |
|         =B o o  |
|        .ooo     |
+----[SHA256]-----+
2.2 配置密钥
复制前一步中生成的 id_rsa.pub 中的内容,之后登陆到 GitHub,在右上角的头像上点击 Settings - SSH and GPG keys,点击右边的 New SSH Key,然后将复制好的内容粘贴进去,标题自己随意取一个,比如 haopen's key,这样就完成了远程端的配置。
2.3 测试连接
问题:在 Git Bash Shell 中输入如下命令后连接失败!
ssh -T git@github.comWarning: Permanently added the RSA host key for IP address ‘192.30.255.112’ to the list of known hosts. Permission denied (publickey).
在网上查阅资料后,感觉有类似经历的人的解决方法似乎都与自己面临的情况不完全吻合,无意中看到 ~/.ssh 目录中有一个名称为 known_hosts 的文件,尝试将其删除后再重新进行了前面的第 1 步和第 2 步,这次再测试时就成功了。
$ ssh -T git@github.com
The authenticity of host 'github.com (192.30.255.113)' can't be established.
RSA key fingerprint is SHA256:nThbg6kXUpJWGl7E1IGOCspRomTxdCARLviKw6E5SY8.
Are you sure you want to continue connecting (yes/no)? yes
Warning: Permanently added 'github.com,192.30.255.113' (RSA) to the list of known hosts.
Hi haopen! You've successfully authenticated, but GitHub does not provide shell access.
3 在 RStudio 中使用 GitHub
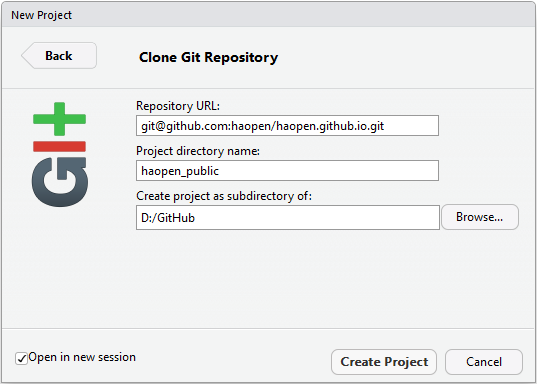
到 GitHub 的网站上新添加一个代码仓库(包含 readme.md),然后打开 RStudio,File - New Project - Version Control - Git,输入 Repository URL(要输入的内容可以在 GitHub 代码仓库右方点 Clone or download 找到),其中 Project directory name 用于设定项目所在文件夹的名称,Create project as subdirectory of 用于指定该文件夹所属的父目录,此外勾选 Open in new session,接下来 RStudio 会将该仓库中的内容 Pull 到本地。
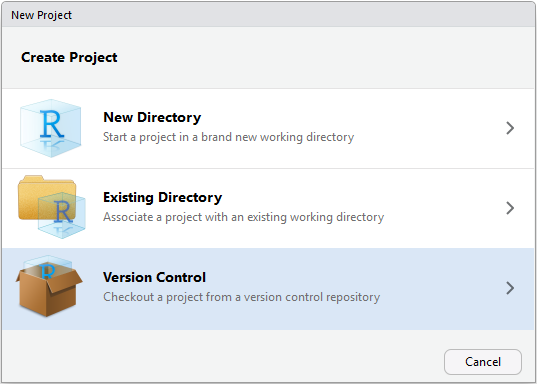
创建一个 Git Repository:Step 1
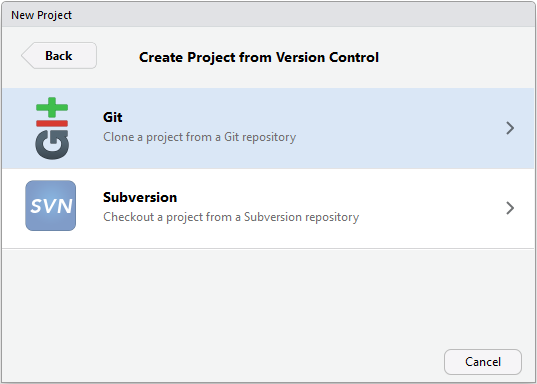
创建一个 Git Repository:Step 2
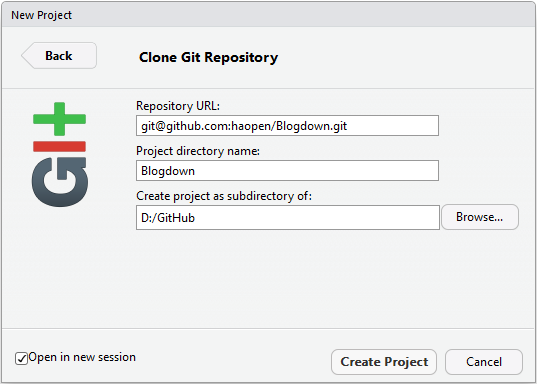
创建一个 Git Repository:Step 3
成功之后显示如下内容:
C:/Program Files/.../git.exe clone --progress git@github.com:haopen/Blogdown.git Blogdown尝试添加文件并保存到,点击右边 Git 面板中的 Commit(直接在 Git 面板中某个文件上点右键,选择 ignore 可以指定应忽略跳过的文件),可以在打开的窗口中勾选需要 Commit 的文件,之后在右半边窗口中填写简单的描述文字,之后可以点击下方的 Commit。
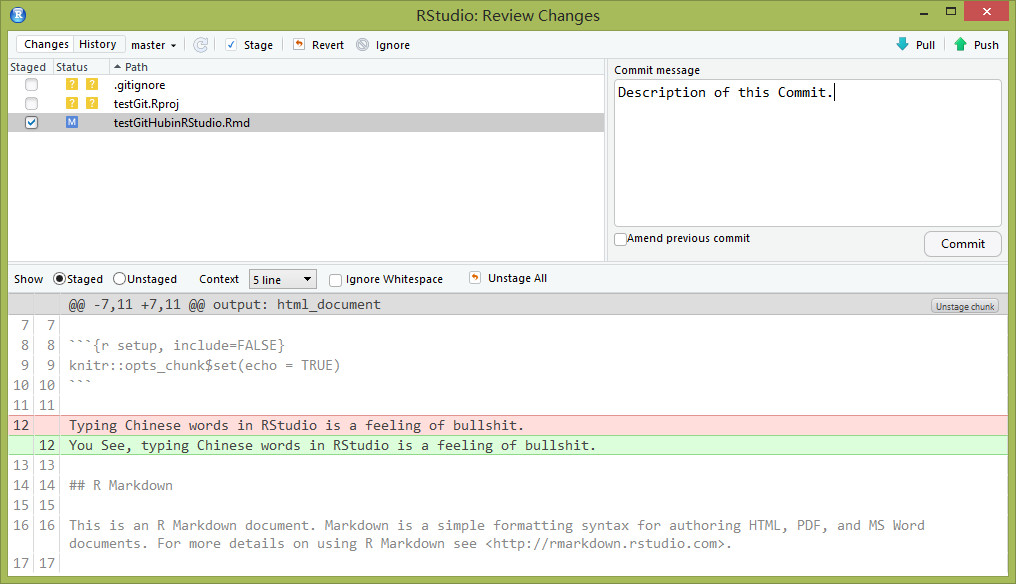
提交一个 Commit
问题:Commit 完成之后,刚开始右上角并没有 Pull 向上箭头,并且尝试提交时会出现 unable to access... The requested URL returned error: 403 类的错误,根据这个讨论,在本地目录中找到隐藏的 .git/config,将其中的
url = https://haopen@github.com/derekerdmann/lunch_call.git修改成
url = ssh://git@github.com/haopen/testGit.git之后再次提交成功,并且上图右上角出现 Pull 向上箭头。当然,更好的做法是在点 Clone or download 时,直接点击 Use SSH,然后复制 git@github.com:haopen/testGit.git 即可。
3.1 发布到 GitHub Pages
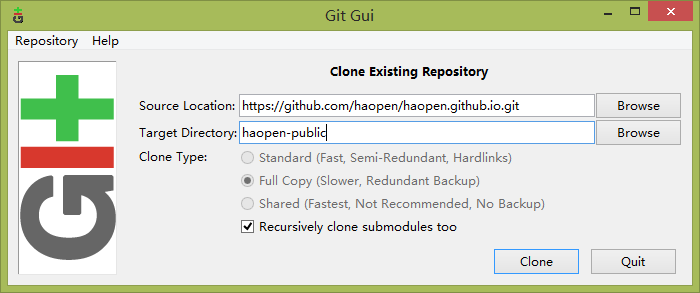
- 先到 GitHub 创建一个名称为
haopen.github.io的代码仓库; - 之后 Clone 到本地1:参考前面在 RStudio 中 Clone Repository 的步骤,也可以先进入到
D:\GitHub,再点击右键,选择Git GUI Here,在打开的窗口中选择Clone Existing Repository,参考下图填写内容即可:
Git 客户端
RStudio 中的 Git 客户端
其中 haopen-public 是在 Hugo 中的 .Rprofile 中指定的内容发布目录,对应的绝对地址是 D:\GitHub\haopen-public。
- 做一个 Commit,之后再 Push,等 Push 完成就可以在 https://haopen.github.io/ 观察到发布后的页面效果。
3.2 连接 GitHub 可能遇到的问题
问题:Push 的时候可能会遇到如下的错误:
Git push origin
ssh: Could not resolve hostname ssh.github.com: Name or service not known
fatal: Could not read from remote repository.
参考 http://blog.csdn.net/qq_17335153/article/details/51701700 的说明,打开 ~/.ssh,在里面新建一个名称为 config 的文件,注意没有扩展名,在其中添加内容:
Host github.com
User haopeng.yn@gmail.com
Hostname ssh.github.com
PreferredAuthentications publickey
IdentityFile ~/.ssh/id_rsa
Port 443
但是通过 ssh -T git@github.com 测试仍然报错:
ssh: Could not resolve hostname github.com: Name or service not known
fatal: The remote end hung up unexpectedly
参考 http://blog.sina.com.cn/s/blog_a3fb1fe30102wieq.html 先通过 ping github.com 获得 ip 地址 192.30.255.113,之后在 /etc/hosts 中添加如下内容2:
192.30.255.113 github.com再测试时就没有问题3:
$ ssh -T git@github.com
The authenticity of host '[ssh.github.com]:443 ([192.30.253.123]:443)' can't be established.
RSA key fingerprint is SHA256:nThbg6kXUpJWGl7E1IGOCspRomTxdCARLviKw6E5SY8.
Are you sure you want to continue connecting (yes/no)? yes
Warning: Permanently added '[ssh.github.com]:443,[192.30.253.123]:443' (RSA) to the list of known hosts.
Hi haopen! You've successfully authenticated, but GitHub does not provide shell access.技巧:在 RStudio 第一次准备将本地大量文件 Commit 时,右侧 Git 面板中的 Staged 对应的 Checkbox 经常点不动,参考 https://pages.github.com/ 后此时可以考虑从齿轮那里打开 RStudio 带的 Git shell,然后在里面输入4:
git add --all
~$git commit -m "Initial commit"
~$git push -u origin master
这种命令行的方式此时可能会更加方便一些。